Drone Photography While Traveling – A Cautionary Tale
Karen is a careful, organized traveler. Researches everything. Packs lists. Prints backup copies of her hotel confirmations. She is not the kind of person who shows up somewhere unprepared. And Karen showed up in Morocco with a brand-new drone she’d spent two months researching, packed beautifully in a custom carry case, charged and ready to capture the kind of aerial footage you see in every travel documentary ever made about North Africa.
Customs took it at the airport. That was that. No footage. No drone. A very long and unhelpful conversation with airport officials, and eventually a sheepish international phone call asking if anyone knew a good lawyer in Casablanca.
Morocco has a blanket ban on personal drones. Has for years. Nobody told Karen. The internet certainly tried to, buried somewhere in paragraph nine of a travel forum post from 2023, but she missed it.
Here’s the thing about traveling with a drone: the photography part is actually the easy part. The regulations, the airlines, the customs officials — that’s where things get complicated. So let’s do this in the right order. Rules first, gear second, shooting tips third.
The Part Nobody Warns You About: Drone Laws by Country
I’ll spare you the diplomatic language. Some countries will confiscate your drone. Full stop.
Morocco is one of them. So are Cuba, Iran, and a handful of others that maintain outright bans. But the trickier category is the countries that technically allow drones but have restrictions so specific and bureaucratic that showing up without advance permits is effectively the same as not being allowed to fly at all. India requires prior approval from the civil aviation authority that can take weeks. Some Caribbean islands allow recreational flight while banning it near beaches — which is, of course, the only place you wanted to fly.
The practical rule I follow before any trip: check Dronesgator’s country database before I pack. It’s not exhaustive, but it’s consistently updated and covers the destinations most travelers actually visit. For anything I’m not sure about, drone-laws.com is a solid second source. Neither of these replaces checking with your specific destination’s civil aviation authority, but they’ll save you from most of the obvious mistakes.
A few destinations worth knowing specifically if you’re planning ahead:
- Europe: Generally drone-friendly, but Germany, France, Italy, and most EU countries require registration for drones even under 250 grams if they have a camera. More on why that number matters in a moment.
- Japan: Registration is mandatory for all drones. Permits required near airports, national parks, and populated areas. The permitting process is real but manageable if you plan ahead.
- Mexico: Technically requires permits for foreign drone operators — in practice, sub-250g drones fly under the radar (figuratively and somewhat literally) at most beach destinations, but you’re flying at your own risk.
- Canada: Drones under 250 grams are allowed without permit, but must follow safe flying rules.
- Morocco, Cuba, Iran: Don’t bother. Seriously.
The destination matters, but so does your gear. Which brings me to the number that will make your travel photography life significantly easier.
249 Grams: The Most Important Number in Travel Drone Photography
Every experienced travel photographer I know who flies a drone has gravitational opinions about the sub-250 gram weight class, and those opinions are basically unanimous: go lighter.
Here’s why. In most countries that regulate drones — including the European Union, the UK, Canada, and Australia — drones under 250 grams are treated as a lower-risk category. They face less stringent registration requirements, fewer permit headaches, and in some cases are exempt from rules that would otherwise ground you entirely. Two-hundred-and-forty-nine grams is not a coincidence. It’s a design choice made specifically to land just under that threshold. NOTE: THIS IS TOTAL DRONE WEIGHT . If you add an extended battery or other extras you could push over this threshold.
The DJI Mini 4 Pro is the drone most travel photographers point to when someone asks what to buy, and it’s not a close race. It weighs 249 grams — right on the threshold. It shoots 4K video at up to 100fps, takes 48-megapixel stills, has omnidirectional obstacle sensing (which is a genuinely forgiving feature when you’re new to this and misjudge a rooftop), and gets about 34 minutes of flight time per battery, or closer to 45 with the extended battery.
It also shoots vertically natively. You rotate the gimbal and you’re shooting 9:16. Given that we covered vertical content pretty thoroughly in a recent post here, I’ll just say: this matters, and it’s a bigger deal than most drone reviews make it out to be.
Is it perfect? No. Low-light performance is the one area where it shows its size — if you’re hoping to shoot golden hour footage in dim, moody conditions, you’re going to see noise. The newer DJI Mini 5 Pro addresses this with a 1-inch sensor, at the cost of a higher price tag. For most beginners, the Mini 4 Pro is the right call. If you’re already an experienced photographer who shoots primarily at dawn and dusk, consider the step up.
For context on what you’re spending: the Mini 4 Pro runs around $760 for the standard package. Budget another $60–80 for a second battery, because you will use it.
Getting the Drone On the Plane Without a Headache
This is where people get surprised, so let’s be clear about the rules.
Drone batteries are lithium polymer batteries, which puts them in a specific category for air travel. The short version: spare batteries must go in your carry-on, not checked luggage. This is not a suggestion. It is an FAA and IATA rule, and airlines enforce it. If a gate agent pulls your checked bag and finds loose drone batteries, best case they remove them, worst case you miss your flight sorting it out.
The drone itself can go in checked baggage with the battery installed. Most travel photographers keep the whole kit in a carry-on anyway to avoid any ambiguity.
Battery capacity matters. Most Mini 4 Pro batteries run around 43Wh, which is well under the 100Wh limit that allows carry-on without special approval. You can bring multiple batteries without any issues. If you ever upgrade to a larger drone with higher-capacity batteries, check the wattage before you travel — batteries over 100Wh require airline approval, and anything over 160Wh is banned entirely.
One more thing that’s genuinely useful and almost nobody does: if you’re a US traveler, register your drone with US Customs before you depart. It’s called a “Personal Effects Taken Abroad” registration and it takes about 10 minutes at the port of departure. What it does is establish that you left with this specific drone, so when you return, nobody can argue you bought it abroad and are importing it undeclared. I’ve never had an issue returning with my drone, but I’ve also never had to have that conversation because the paperwork exists.
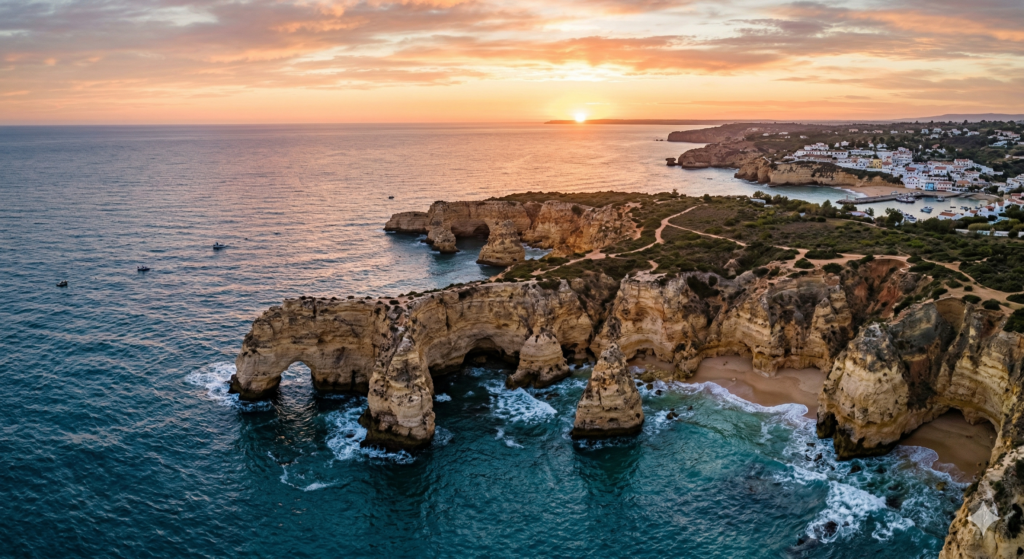
Actually Shooting Something Worth Looking At
OK. Regulations handled. Batteries sorted. Drone legally in your carry-on. Now the fun part.
The instinct for most new drone photographers is to go wide. Up as high as possible, widest angle available, show everything. The results are technically impressive and photographically boring. Great aerial travel photography works the same way great ground-level photography works: with a subject, a frame, and a point of view.
A few things that changed my aerial shooting:
Think about altitude layers, not just maximum height. Some of the best drone shots I’ve seen were taken at 20–30 feet — just high enough to get above street level, low enough to still feel connected to the subject. The sky-high overview shot is a tool, not the only tool.
Put something interesting in the foreground. A lone sailboat on an otherwise empty harbor. A winding coastal road leading toward a village. A person walking down a deserted beach. Scale and context make aerial shots feel purposeful rather than just pretty.
Integrate aerial into the story, don’t lead with it. The strongest travel photo essays use aerial footage as a scene-setter — one or two shots that establish where you are — before moving into the ground-level, human, textured work that actually carries the narrative. A drone shot at the start of a reel that then cuts to street-level footage tells a story. Twelve drone shots in a row is a real estate listing.
Practice flying before you go on vacation. This is a must. Don’t head out and try to fly your drone for the first time, or you may end up crashing it into something (or someone) just like I did. That’s a story for a different day. Trust me, practice.
Check the rules at the specific location, not just the country. National parks, UNESCO sites, beaches, and areas near airports have their own drone restrictions that exist independently of national law.
The Bottom Line
Drone photography is one of the most genuinely exciting tools a travel photographer has right now. The footage you can capture with a $760 drone and a bit of planning would have cost a film crew tens of thousands of dollars not that long ago. The barrier to entry has basically never been lower.
The barrier to getting that footage home without incident, though, requires a little homework. Check the laws before you pack. Keep your batteries in your carry-on. Register with customs if you’re American and leaving the country. Start with the DJI Mini 4 Pro unless you have a specific reason to go bigger.
And maybe don’t go to Morocco. At least not with the drone.
Are you already flying a travel drone, or thinking about getting into it? Drop your gear setup or your favorite location to fly in the comments — I’d love to hear what’s working for people out there.